Installing Active Directory on Windows Server 2019
In this tutorial, you will find how to install Active Directory in Windows Server 2019. This will be accomplished by installing the appropriate role and upgrading the server to a master domain controller (DC). We will also add the DNS role to take advantage of the zone capabilities integrated into Active Directory.
Basically, it is a two-step process, installing the ADDS role and upgrading it to a DC.
Adding the Active Directory Domain Services Role
But at first, you should set a static IP address on your server, and find the appropriate name for your Windows Server to match your company’s naming policy. After completing this step, proceed to set up ADDS.
Run Server Manager, click Manage -> Add Roles and Features.
Server Manager
Right after that the wizard window appears. Under “Before You Begin” click “Next“.
Now we need to select an installation type, it can be based on server roles or virtual infrastructure (based on Hyper-V), chose the first setting and continue in a new window.
Active Directory Installation Wizard
In the “Server selection”, we need to choose our server, usually it is allocated by default and continue to the next section.
Server Selection
Here we came to Server Roles, select Active Directory Domain Services and accept addition of related features. Click the Add Features -> Next.
Server Roles
The next window is named “Features” but here we need nothing to add so just go to the next section.
Windows Server Features
The ADDS section displays summary info about your AD, here we just click Next.
And at last, we proceed to installation, click Install and wait a little bit until installation completes.
AD INstallation Process
Upgrading Server to a DC
After finishing the installation, unless you close the window, there will be a link in finish summary to promote the server to a DC. This is highlighted as blue text.
AD Installation Process Complete
However, it is possible to promote the server through notifications in server manager.
Promoting Server
Click on “Promote server to domain controller“. And you will be brought to AD deployment wizard that will help you to create a forest in AD.
In “Deployment Configuration“, you should choose the “Add a new forest“, and then you need to think about your domain name (Note that it must not be like a domain name on your organization’s website, it must differ, otherwise you will have serious DNS problems) and type it in the proper field. In my case it is office.local, and click Next afterwards.
Add New Forest
Now we have reached the”Domain Controller Options“. Here you need to specify the domain functional level. Note that it can differ from you current OS version, for 2019 Windows server, 2016 is only available. For the first AD server chose the latest version of the functional level. And if it is not the first one then you need to sync the level among other controllers.
In our example we will also choose DNS server option because we dont have standalone DNS, chose it whether you need it or not in your infrastructure.
You should also specify the password for restore mode (DSRM), save it in your corporate password manager and click “Next” to continue.
Domain Controller Options
Probably you will notice a DNS warning message, but it should not bother you at this time. Ignore it and move further.
DNS Options
So, we arrived to the NetBIOS name, I recommend you to leave it as it is but you can change it as you like, don’t forget to specify it in capital letters. Move Next.
ADDSCW Additional Options
Under “Paths” choose where the location of NTDS, SYSVOL and LOG folders. You can choose a different drive depending on your preferences and settings but default is also acceptable.
Paths
Under “Review Options” you will see a summary of your selections. Check it carefully for mistakes, move next if it is ok.
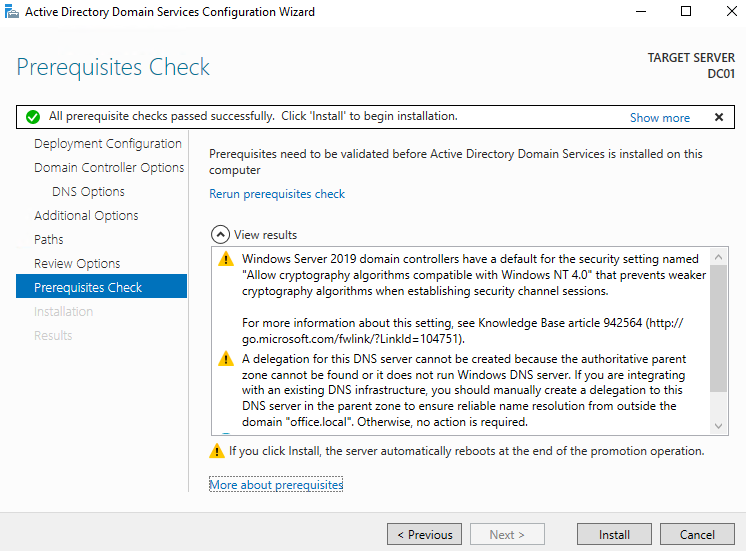
The “Prerequisites Check” section checks for your server prerequisites. Here, if it finds an error the installation process will be aborted and you will need to correct it. Otherwise, if only warning messages are displayed (which is usual), but the check was successful as shown, click Install to continue.
Prerequisites Check
And here you need to wait a little bit for installation process to complete. Immediately after that, the server automatically restarts.
Installation
After server finishes its reboot process, your first domain controller will be ready to use and you can leverage all the features such as ADUC and ADAC.
Active Directory Recycle Bin enables a feature for administrators to restore deleted objects.
Finding Domain Naming Master Server
We recommend enabling Recycle Bin feature on your DC with Domain Naming Master role. In order to get what domain controller holds this role, you need to use netdom.exe application with following parameters (run it in cmd):
netdom.exe query fsmo
Alternatively, this can be achieved in PowerShell console under elevated privileges:
Import-Module ActiveDirectory
Get-ADForest | Format-List DomainNamingMaster
How to Enable Recycle Bin in AD Administrative Center.
To do this, you need a domain admin user account. Start AD Administrative Center(start->run->dsac.exe).
Click on your domain name and in the “Tasks” pane click “Enable Recycle Bin…“.
Alternatively, right-click your domain in overview, and click “Enable Recycle Bin…”.
The confirmation window appears, which tells us that Recycle Bin can only be enabled once without a disabling option. Click OK.
After enabling the bin we need to refresh ADAC window click OK in appeared warning and refresh ADAC by clicking on refresh button in top right corner of the window:
You will see that new container named “Deleted Objects” appears near “Computers” container.
How to Enable Recycle Bin in PowerShell Console.
Recycle Bin can also be enabled with PowerShell console. You need to run PowerShell.exe under elevated permissions and type in the following code:
Replace office, local, office.local with your own domain parameters. System will ask for confirmation, type in “y” to continue and “Deleted Objects” container appears.
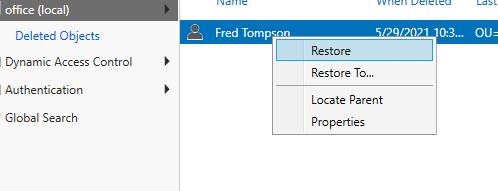
So now after an AD object is deleted it’s “isDeleted” attribute is set to “true”, however it’s “isRecycled” attribute is untouched. With these parameters deleted object moves to “Deleted Objects” from where you can easily restore it by right-clicking it and selecting restore.
In 60 days the recycle lifetime expires, and “isRecycled” parameter changes to “true“, in this case an object is deleted permanently.
How to Troubleshoot AD Replication using Repadmin Tool
Repadmin is a cmd application for diagnosing AD replication issues. Via Repadmin it is easy to view replication topology for every domain controller. And use this knowledge to manually change it and initiate replication communications between controllers. With Repadmin you can easily check replication metadata and relevance vectors (up-to-dateness (UTDVEC)).
Repadmin.exe is a built-in feature in Windows Server environment starting from 2008. It comes with AD Directory Services role and also can be setup in client OSes like Windows 10 with RSAT.
Command List
Repadmin.exe has lots of commands, lets focus on most popular ones:
/syncall – used to synchronize a certain DC with others
/prp – if you have a Password Replication Policy (PRP), this command helps to manage it
/queue – Shows the current queue of replication
/replicate – this command helps to perform replication from one DC to another
/replsingleobj – This command is handy if you need to replicate only one certain object between DCs
/replsummary – Shows a report of a current state of replication and health in AD
/showattr – is used when you need to see object attributes
/showbackup – this setting displays the last backup time
/showrepl – If you need to know current replication status use this one
How to Get General Replication Status
Let’s start from overall state of replication, run elevated cmd.exe (start->run->cmd.exe) and type in the following command:
repadmin.exe /replsummary
The output will show you any replication failures that exist in your AD environment.
How to Force Replication
Suppose you have replication failures and you need to force a replication after fixing networking connections failure. In elevated Command Prompt (cmd.exe) on any DC run:
repadmin.exe /syncall /Aped
In addition to /syncall command we have few flags that will synchronize all partitions (/A), using push notifications (/p), in enterprise mode across Active Directory sites (/e) using distinguished names instead of DNS names (/d).
How to Manage Inbound and Outbound Replication
It is possible to disable inbound and/or outbound replication with a possibility to reenable it later. To achieve that run the following commands in cmd under admin rights:
repadmin.exe /options DC01 +DISABLE_INBOUND_REPL
Disables inbound replication on a DC01
repadmin.exe /options DC01 +DISABLE_OUTBOUND_REPL
Disables outbound replication on a DC01
repadmin.exe /options DC01 -DISABLE_INBOUND_REPL
Enables inbound replication on a DC01
repadmin.exe /options DC01 -DISABLE_OUTBOUND_REPL
Enables outbound replication on a DC01
For example, the option to disable outbound replication is a good way to perform schema updates without the need to rebuild the entire Active Directory forest.
Users are one of the most popular objects in AD. They are used for authentication and authorization on workstations. Also in many services which are integrated with AD. User management is the main routine for sysadmins and helpdesk specialists. This guide helps to manage such objects in multiple ways. For managing users there is a need to install RSAT tools or manage them from your DC. You have to be signed under domain admin or an Account Operators user or with delegation rights to create objects in the current OU.
Contents
Creating User Accounts
Deleting User Accounts
Moving User Accounts
Renaming User Accounts
Enabling User Accounts
Disabling User Accounts
Setting Expiration Period for an Account
Finding Locked-out Accounts
Unlocking User Accounts
Modifying Several Users in Bulk
Creating a User Account
There are many ways to create a user account in AD, lets consider several of them.
Creating User Account Using Active Directory Users and Computers(ADUC)
Run ADUC (dsa.msc).
Go to OU where new users should be located. In the taskbar, click the “New User” icon, or right-click on a white space in the main window and then click on “New -> User“. Another way is rightclicking the needed Org Unit and select “New -> User“.
Creating New User
“New Object — User” appears, specify parameters for your user:
• Full name, by either typing the full name into Full Name field or typing it in the First and Last name fields.
• User logon name, this field creates the userPrincipalName and the sAMAccountName attributes.
User Account Details
Click Next and specify strong password and then retype it in the next field and check the needed parameters, usually for regular user you should check “User must change password at next logon”.
User Password Settings
Click Next and Finish. Congratulations new user was successfully created!
Creating User Account Using Command Prompt
To make the same thing in cmd we need to use dsadd.exe utility. The following parameters will help to create a user in “Users” container in AD and set default password for it:
Lets delete a user from AD environment, follow these easy methods. Note that this action will not completely delete a user account with enabled AD Recycle Bin, it will change its token attributes and move it to deleted objects.
Deleting User Account in Active Directory Users and Computers(ADUC)
Lets delete one user, to achieve that open Active Directory Users and Computers (dsa.msc).
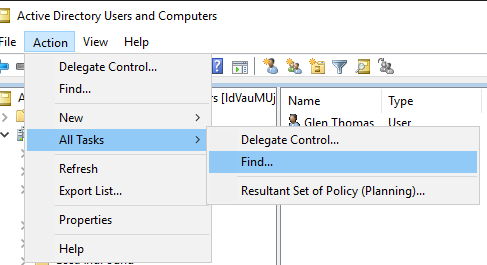
Go to the OU or container where the user that you need to delete resides. Click on the Action menu or rightclick the OU and select Find.
Find a User
Type in the name or last name of the user you want to delete into the name field and click “Find Now”. The results will be displayed to you, select the object you need to delete, rightclick it and then click on Delete and confirm your decision.
Deleting a User
Deleting User Account Using Command Prompt
The following cmd string will delete a user “GSoul” from office.local domain:
dsrm.exe user "CN=GSoul,CN=Users,DC=office,DC=local"
Deleting User Account Using PowerShell
Execute the following PowerShell code to delete a user GSoul from AD:
Moving a User Account via Active Directory Users and Computers(ADUC)
In ADUC (dsa.msc) go to the OU or container with needed user account. Rightclick it and select Find…. In the Name field, type the name of the user account and then click Find Now… From the list of Search results, select the needed user object.
Right-click on the user account. Select Move… from the menu.
The Move window appears:
Moving a User Account
In the Move window, navigate to the OU or container where you want to move the user object to, select it and click OK.
Moving a User Account via Command Prompt
In order to move user object(GSoul in our case) to “Employees” OU run dsmove.exe in cmd with the following parameters:
In order to rename a user account, follow these several instructions.
Renaming a User Account via Active Directory Users and Computers
In Active Directory Users and Computers (dsa.msc) in the View menu, enable Advanced Features.
Navigate to OU or container where needed user object resides. Right-click it and select Find…. In the Name field, type the name of the user and press “Find Now”. From the search results right-click the needed user account and select Rename. Type the new name and press Enter.
Renaming a User Account
In the Rename User window, enter new data for other attributes and click OK.
Renaming a User Account via Command Prompt
Use dsmove.exe with the following parameters in order to rename a user:
How to Enable and Disable a User Account in Active Directory
If you want to stop a user logging into their workstation you can disable it, but you need it again for some reason, for example, an employee returned from maternity leave, you can enable it again. Here is the guide to do that in multiple ways.
Enabling and Disabling a User Account Using Active Directory Users and Computers
To enable/disable a user in ADUC, follow these steps:
In ADUC (dsa.msc). Determine the OU or container storing needed accounts. Rightclick it and select Find…. In the Name field, type the name of the user account and then click Find Now… From the list of Search results, select the needed user object, right-click it and select Enable account or Disable account depending on what you need right now and click OK.
Disabling a User Account
Enabling/Disabling a User Account Using cmd.exe
These tasks are for dsmod.exe, use it with the following settings to enable an account.
dsmod.exe "CN=GSoul,CN=Users,DC=office,DC=local" -disabled no
And this will disable it:
dsmod.exe user "CN=GSoul,CN=Users,DC=office,DC=local" -disabled yes
Enabling and Disabling a User Account Using Windows PowerShell
Here is the PowerShell code to enable a user account:
How to Set Account Expiration Period to a User Account
User accounts can be set to automatically expire after certain period of time.
Setting Account Expiration Period in ADUC
To set account expiration in ADUC, follow these simple steps:
In ADUC (dsa.msc) go to the OU or container with needed user account. Rightclick it and select Find…. In the Name field, type the name of the user account and then click Find Now… From the list of Search results, select the needed user object. Right-click it and select Properties. Select the Account tab, at the bottom of this tab, change the Never option for “Account expires:” to End of:, and select needed date. Click OK to save the changes.
Setting User Account Expiration Period
Setting Account Expiration Period Using cmd.exe
Use the dsmod.exe to set the quantity of days before an account expires:
dsmod.exe user "CN=GSoul,CN=Users,DC=office,DC=local" -acctexpires 90
Setting Account Expiration Period Using Windows PowerShell
To set user expiration period in Employees OU execute the following PowerShell script:
User accounts may get locked-out for some reason and you need to troubleshoot the cause of account lockout, but first of all you need to get the list of them. There are several ways to get this list.
Finding Locked User Accounts with the Active Directory Administrative Center
Run Active Directory Administrative Center (dsac.exe). Select the OU or container where you want to search for locked out users. Expand the top bar by clicking on an arrow button in the right top corner.
Click on Add criteria and select the “Users with enabled but locked accounts” criteria. Click Add and the locked-out accounts will be displayed.
Finding Locked Out Accounts
Finding Locked User Accounts with Windows PowerShell
In order to find locked out accounts in AD, user the following PowerShell script:
Account lockout in one of the most often cases for sysadmins in organization. Sometimes it is even hard to get its cause so it requires deep investigation. But it is not the point to disable an account lockout policy because it helps to protect your user accounts from brute force attacks. In this guide we will focus on easy techniques to unlock users.
Unlocking User Accounts via Active Directory Administrative Center
To unlock a user object, open the Active Directory Administrative Center (dsac.exe), navigate to the OU or container where users exist in. Right-click the object you want to unlock and select Properties.
In the User window click the Unlock account and then OK.
To unlock all locked-out accounts in a certain OU or container select the OU or container where you want to search for locked out users. Expand the top bar by clicking on an arrow button in the right top corner. Click on Add criteria and select the “Users with enabled but locked accounts criteria.” Click Add and the locked-out accounts will be displayed. Select all accounts, go to Properties and click on Unlock account.
Unlocking User Accounts via Windows PowerShell
To unlock a user account, you need to run the following PowerShell code:
Sometimes there is the need to modify one attribute for multiple objects. Modifying multiple objects at once is slightly different task from editing a single user, and there are several ways to achieve that.
Modify Several Users at Once Using ADUC
ADUC is great when you need simple filters to group users by certain criteria. It has selection mechanism, for example you can select multiple different users with Ctrl button pressed or a chunk with Shift button pressed. You can also easily select all users in an OU or container by pressing Ctrl + A.
So, you need to change some settings in multiple user accounts, let’s do that with AD:
In ADUC (dsa.msc) locate the OU that fits your needs. Select the user objects while the Shift button being pressed. Rightclick all these objects and select Properties.
Change the given attributes according to your needs and click OK.
Modifying Multiple Users via ADUC
Modify Several Users at Once Using Active Directory Administrative Center
The ADAC differs from ADUC by providing additional filters.
Run ADAC and select the OU to use as the base scope for the filter.
Expand the top bar by clicking on little arrow button at top right corner. Click the Add criteria button:
Filtering Search in ADAC
Add the criteria you want to use such as “Users with expired passwords” or you can create a filter by one of the attributes. Select the filter and click Add to load it. You can use matches such as starts with, equals, does not equal, is empty, and is not empty.
After you receive the list of objects based on your filter press Ctrl+A to select all of them and click Properties.
Modifying Multiple Users via ADAC
Change attributes that you want to modify and click OK.
Modify Several Users at Once Using Windows PowerShell
Filter customization in PowerShell is more advanced, it is best used to modify multiple user objects, repeatedly.
In our example we will filter all accounts with name starting with “admin” and enable “Prevent from accidental deletion” for all these accounts:
When you join a computer to the Active Directory domain or create a user, all these objects will be placed in default containers – Computers and Users. In order to place your new objects to relevant OUs with proper group policies you need to change their default location. This tutorial will show you how to do that.
Modification the default location for new user and computer objects is possible in Windows Server 2003 and above. And you need to have a user account with domain admin rights and perform commands directly from the server not from a management workstation.
By default design, new computers are stored in Computers container and new users in the Users container because containers can’t have policies linked, so even if there is a problem with AD because of GPOs there should be a possibility to join a device and sign in to it without group policies.
Modifying the Default Location for User and Computer Objects
First, we need to create or decide the OUs to which we want to redirect. One for computers another for users. In our example it will be Employees and Workstations. For this purpose, Microsoft created redirusr.exe and redircmp.exe which are located in %SystemRoot%\System32 folder.
Run Command Prompt (cmd.exe) as administrator, run the following commands, replacing the values for your environment:
Logon scripts can be very handy when we need certain actions been done with a user logon such as mapping a network drive. This tutorial will show you how to assign a logon script using Group Policies.
In order to do that your account must have Domain Admin rights, delegated “edit GPO settings” rights or be an owner of the GPO.
There are four types of script you can use with Group Policy:
Logon scripts (User Configuration)
Logoff scripts (User Configuration)
Startup scripts (Computer Configuration)
Shutdown scripts (Computer Configuration)
In this example we will be focused on Logon Scripts.
Assigning Logon Scripts via Group Policy Management Console
Run Group Policy Management Console (GPMC.msc) on a domain workstation or server where it is installed.
In the left pane, expand your domain Forest -> Domains and then navigate to the domain where you want to assign a logon script.
Expand the domain name and then expand the Group Policy Objects.
Select the GPO or create a new one for assigning a script. Right-click GPO and select “Edit”.
Editing a Group Policy Object
• The window with Group Policy Management Editor (gpedit.msc) appears. • Expand User Configuration -> Policies -> Windows Settings. • Then select Scripts and double click «Logon». • In the Logon window, click the Add… button. • The “Add a Script” window appears:
• Type path to your script in the “Script Name:” field or browse to its location by clicking on “Browse…” button. • In the “Script Parameters:” field, type any optional script parameters. • Click “OK” to save the script settings and “OK” to close the “Logon Properties” window. • Close the Group Policy Management Editor and link your policy to and organizational unit (OU) where you want logon scripts to run. • To do that click on an organizational unit and then click on “Link an Existing GPO”.
• Choose the GPO we’ve just edited and click “OK”. After that right-click on the Organizational Unit and select “Update Group Policy”. In the appeared windows click on “Yes”.
Now all workstations in the OU will get our group policy with logon script and after reboot and user login the script will be executed.
GPResult.exe – is a console application designed to analyze settings and diagnose group policies that apply to a computer and/or user in an Active Directory domain. Specifically, GPResult provides the resulting set of policies (RSOP), a list of applied domain policies (GPOs), their settings, and detailed information about processing errors. The utility has been part of the Windows operating system since Windows XP. The GPResult utility let you know whether a particular policy applies to a computer, which GPO has changed a particular Windows setting, and why it takes so long for GPP/GPO to apply, even if you’ve run gpupdate /force.
In this article, we will look at how you can use the GPResult command to troubleshoot and debug the application of Group Policy in an Active Directory domain.
Contents
Resultant Set of Policies (RSOP)
How to Use GPResult Utility
How to Get RSOP HTML Report via GPResult
How to Get GPResult Data From a Remote Computer
How to Get RSOP Data for a Certain User
Possible Reasons for GPOs to not Apply
Resultant Set of Policies (RSOP)
Initially, the RSOP.msc graphical console was used to diagnose the application of group policies in Windows, which allowed the resulting policy settings (domain + local) to be applied to the computer and the user in a graphical interface similar to the GPO editor console.
Resultant Set of Policies (RSOP)
However, the RSOP.msc console does not make sense in modern versions of Windows, as it does not reflect the settings applied by various client side extensions (CSEs), such as GPP (Group Policy Preferences). Also, it does not allow searching, and provides little diagnostic information. Therefore, the GPResult command that is the primary tool for troubleshooting GPOs in Windows. Moreover, in Windows 10, there is even a warning that RSOP does not provide a full report as opposed to GPResult.
How to Use GPResult Utility
In order to check for group policy enforcement the GPResult command have to be run on the computer where you want to check for it. The GPResult command has the following syntax:
To learn more about Group Policies that apply to the following AD object (user and computer) and other settings related to the GPO infrastructure (i.e. the resulting GPO policy settings – RsoP), run the command:
Gpresult /r
The results of the command execution are divided into 2 sections:
COMPUTER SETTINGS – this section contains information about GPO operating on the computer
USER SETTINGS – user policies (policies that apply to the user account in AD)
Let’s briefly run through the main settings/partitions that may be useful in GPResult output:
Site Name – the name of the AD site where the computer is located;
CN – full canonical user/computer name for which RSoP data were generated;
Last time Group Policy was applied – the time when Group Policy was last applied;
Group Policy was applied from – the domain controller from which the latest version of the GPO was downloaded;
Domain Name and Domain Type – the name and version of the Active Directory domain schema;
Applied Group Policy Objects – lists of active Group Policy Objects;
The following GPOs were not applied because they were filtered out – not applied, filtered GPOs;
The user/computer is a part of the following security groups – domain groups that the user belongs to.
gpresult /r output
In our example, you can see that there are 3 Group Policies that apply to the user object.
Default Domain Policy;
Drive Mapping;
Outlook Coding;
If you do not want the console to display both user and computer policies at the same time, you can use the /scope option to display only the needed section. For example here is the command for user settings:
gpresult /r /scope:user
And here is for the computer policies:
gpresult /r /scope:computer
Since the Gpresult utility outputs its data directly to the command line console, which is not always convenient for further analysis, its output can be redirected to the clipboard:
Gpresult /r |clip
or a text file:
Gpresult /r > c:\gpresult.txt
To output RSOP super detailed information, you need to add the /z key:
Gpresult /r /z
How to Get RSOP HTML Report via GPResult
In addition, the GPResult utility can generate an HTML report on the applied resulting policies (available in Windows 7 and above). This report will contain detailed information about all system settings that are set by Group Policies. The resulting report is structured like the Settings tab in the Domain Group Policy Management Console (GPMC). You can generate a GPResult HTML report using the following command:
GPResult /h c:\temp\GPreport.html /f
GPResult HTML Report
To generate a report and then automatically open it in your browser, follow the command:
GPResult /h GPReport.html & GPReport.html
The gpresult HTML report contains quite a lot of useful information:
GPO’s application errors
Processing time in ms
Application of specific policies and CSE (that are located in Computer Details ⇒ Component Status)
As you can see, this HTML report is much more useful for analyzing the policies than the rsop.msc console.
How to Get GPResult Data from a Remote Computer
GPResult can also collect data from a remote computer, eliminating the need for the administrator to log on to the remote computer locally or via RDP. The syntax of the command to collect RSOP data from the remote computer is the following:
GPResult /s servername /r
Similarly, you can remotely collect data by both user and computer policies.
How to Get RSOP Data for a Certain User
When UAC is enabled, running GPResult without elevated privileges displays only the user’s group policy settings. If you want to display both settings at the same time (User and computer settings), you need to run the command with administrative privileges. If the cmd.exe with elevated privileges is run on an account that differs from the current system user, the utility will generate an INFO warning: The user “domain\user” does not have RSOP data. This happens because GPResult is trying to collect information for the user who started it, but because the user has not logged on, there is no RSOP information for him. To collect RSOP information for a user with an active session, you need to specify their account:
gpresult /r /user:domain\username
If you do not know the name of an account that is logged on to a remote computer, the account can be obtained this way:
qwinsta /SERVER:remotePCname
Also check the time (and time zone) on the client. The time must correspond to the time on the PDC (Primary Domain Controller).
Possible Reasons for GPOs to not Apply
While troubleshooting group policies, you should also take a look at the section: “The following GPOs were not applied because they were filtered out“. This section displays a list of GPOs do not apply to this object. Policy may not apply due to following options:
Filtering: Not Applied (Empty) – the policy is empty (there’s nothing to apply);
Filtering: Denied (Unknown Reason) – It is likely that the user or computer does not have permission to read/apply this policy. Permissions can be configured in the Security tab in the Group Policy Management Console (GPMC);
Filtering: Denied (Security) – the “Apply Group Policy” section has an explicit deny permission, or the AD object is not listed in the Security Filtering section of the GPO settings.
You can also understand whether the policy should apply or not to a specific AD object on the Advanced ⇒ Effective Access tab.
So, these are all options for the Group Policies diagnostic features using the GPResult utility.
How to Update Windows Group Policy on Domain Computers
In this article, we will take a look at the features of updating Group Policy settings on Active Directory domain computers:
Automatic Group Policy update interval
The GPUpdate command
Remote update via the Group Policy Management Console (GPMC.msc)
PowerShell Invoke-GPUpdate command
Group Policy Update Interval
In order for the new settings that you have defined in a Local or Domain Group Policy (GPO) to apply to clients, the Group Policy Client service must reload the policies and make changes to the client settings. This process is called updating Group Policies. Group Policy settings are updated when the computer boots up and the user logs on, or automatically in the background every 90 minutes plus random offset between 0 and 30 minutes (i.e., the policies are guaranteed to apply to clients between 90 and 120 minutes after the GPO files are updated on the domain controller).
Domain controllers by default update the GPO settings much more frequently – once every 5 minutes. You can change the refresh interval for GPO settings using the Set Group Policy refresh interval for computers option, which is located in the GPO Computer Configuration ⇒ Administrative Templates ⇒ System ⇒ Group Policy section. Enable the policy and set the time (in minutes) in the following settings:
This setting allows you to customize how often Group Policy is applied to computers (0 to 44640 minutes) – if you specify 0 here, the policies will start to update every 7 seconds – you should not do this
This is a random time added to the refresh interval to prevent all clients from requesting Group Policy at the same time (0 to 1440 minutes) – the maximum value of a random time interval that is added as an offset to the previous setting.
Set Group Policy Refresh Interval for Computers
Keep in mind that frequent GPO updates result in increased traffic to domain controllers and increased network load.
GPUpdate.exe – Group Policy Settings Update Command
All administrators are familiar with the gpupdate.exe command, which allows you to update group policy settings on your computer. Many of them do not hesitate to use the gpupdate /force command to update the GPO. This command forces the computer to reread all the policies from the domain controller and reapply all settings. The client accesses the domain controller, and receives ALL policies that are targeting it. This puts an increased load on the network and the domain controller.
A simple gpudate without /force key command applies only the new/changed GPO settings.
If all is OK when we update the GPO, the following lines should appear:
Updating policy…
Computer Policy Update has completed successfully.
User Policy Updating has completed successfully.
If any policies or settings have not applied, use the gpresult command to troubleshoot.
You can separately update GPO user settings by running the following command:
gpupdate /target:user
or just computer policies:
gpupdate /target:computer /force
If some policies cannot be updated in the background, gpudate can force the logoff of the current user:
gpupdate /target:user /logoff
Or reboot the computer (if the GPO changes can only be applied when Windows boots):
gpupdate /Boot
Force Update of Group Policy from the Group Policy Management Console
GPMC.msc (Group Policy Management Console), starting with Windows Server 2012, provides the ability to remotely update Group Policy settings on domain computers.
In Windows 10, you will need to install the RSAT component to use this console. In order to install it run the following command with administrator privileges:
Now, after changing the settings or creating and linking a new GPO, all you have to do is right click on the desired Organizational Unit (OU) in the GPMC and select Group Policy Update from the context menu. In the new window, you will see the number of computers that will update the GPO. Confirm the forced policy update by clicking Yes.
Group Policy Update via GPMC
Then, the GPO begin to update on each computer in the OU and you get a result with the status of the policy update on the computers (Succeeded/Failed).
This command remotely creates a scheduled task on the computers with the GPUpdate.exe /force command for each logged user. The task starts at a random time interval (up to 10 minutes) to reduce the network load.
The following conditions must be met for this GPMC functionality to work on the client:
TCP port 135 needs to be opened in Windows Firewall
Windows Management Instrumentation and Task Scheduler services must be enabled
If the computer is shut down or access to it is blocked by the firewall, the message “The remote procedure call was cancelled” will appear next to the computer name.
In a nutshell, this functionality would have the same effect if you had manually updated the policy settings on each computer with the GPUpdate /force command.
Group Policy Update with Invoke-GPUpdate Powershell Command
You can also trigger remote Group Policy updates on computers using the Invoke-GPUpdate PowerShell cmdlet (included in the RSAT). For example, you can use the command to remotely update user policies on a specific computer:
You can specify a random delay in updating a GPO using the RandomDelayInMinutes setting. In this case you can reduce the load on the network if you want to update policies on multiple computers at the same time. The RandomDelayInMinutes 0 setting is used to apply the policies immediately.
For inaccessible computers, the command will return the error:
Invoke-GPUpdate: Computer "spb-srv01" is not responding. The target computer is either turned off or Remote Scheduled Tasks Management Firewall rules are disabled.
When running the Invoke-GPUpdate command remotely or updating a GPO through the GPMC, a cmd window may briefly appear on the user’s monitor with the gpupdate command running.
In this article we will see how to change (reset) the password of one or more Active Directory users from the PowerShell command line using the Set-ADAccountPassword cmdlet.
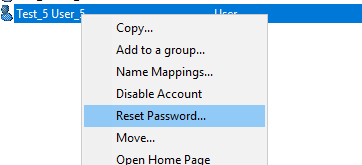
Most system administrators reset user passwords in AD using the dsa.msc (Active Directory Users & Computers – ADUC) snap-in. They simply find the user account in AD, right-click on it and select Reset password.
But it is not possible to use the ADUC console when you need to reset the password to multiple users at once. In this case, you can change AD passwords from the PowerShell command line.
Import Active Directory Module
To reset a user password in AD, the Set-ADAccountPassword cmdlet is used, which is included in the Active Directory module for Windows PowerShell. In Windows desktop versions it is included in RSAT, and in server editions it is installed as a separate component of AD DS Snap-Ins and Command-Line Tools. Before using the module, you must import it into a PowerShell session:
Import-module ActiveDirectory
Check for Password Reset Rights
To reset your password, your account must have the appropriate rights. Naturally, normal AD users by default cannot reset other accounts’ passwords for this feature to be available, the user (user group) must be delegated the right to reset the password on the AD container, or add it to the domain Account Operators group.
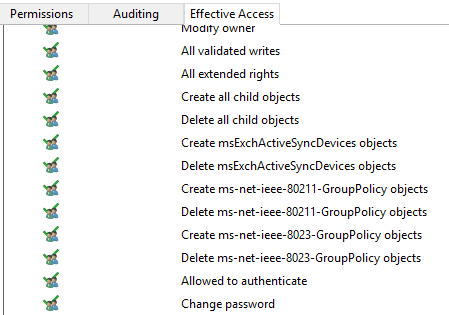
To verify that your account has the right to reset a particular user’s password, open its properties, go to the Security -> Advanced -> Effective Accesstab, specify your account name and make sure that you have Reset Password permission.
Reset Password for a Single User Account
To reset a password for a user with a testuser logon name and set a new password to it, follow the command:
By default, the cmdlet returns the object and displays nothing in the console. To display information about the user object in AD we are using the -PassThru option.
As username you can specify SamAccountName (our case), objectGUID, SID of the user, or his DN (Distinguished Name, e.g. CN=TestUser,OU=Users,DC=testdomain,DC=com).
If you do not specify the -Reset parameter when changing the user password, you must specify the old password first and only then a new one.
Note. If the following error occurs when resetting the password using the Set-ADAccountPassword command:
Set-ADAccountPassword : The password does not meet the length, complexity, or history requirement of the domain.
This means that complexity, length or history requirements are defined in the domain password policy or granular password policy but the enetered password doesnt meet them.
If you have PowerShell command history enabled and you do not want passwords to be visible in the PoSh console, the password must be converted to a secure string:
$NewPwd=Read-Host "Enter new user password" -AsSecureString
When the password is reset, EventID 4724 is logged on the domain controller (DC) in security settings of the event log. This event helps to define who has reset the password on the domain controller.
Change the Password of Several Users in AD at Once
We’ve showed you how to reset a single user’s password in AD using PowerShell. Lets consider another scenario where you need to change passwords of multiple users at the same time.
The simplest scenario is when you need to reset passwords of all users with certain account properties. For example, you need to force all employees from marketing department to reset their passwords to default password and force them to change their passwords the next time they log on:
Now let’s consider another case. Let’s say you have a CSV / Excel file that contains a list of users who need to reset passwords with a unique password for each user. The format of the file testusers.csv: